Objective
Run Apache Tomcat in a Docker container and deploy a servlet.
We are going to use one of the Tomcat images on Docker Hub. There are several images using different versions of the JRE. The JRE version should match the version we’ll use to develop the servlet.
Refer to the previous posts about Docker if you need an introduction (introduction, storage).
Steps
1. Create the Container
Run the following commands to create a container for Tomcat 9.0.10 using JRE8
docker volume create tomcat-volume

docker run -d -p 8080:8080 --name tomcat \
-v tomcat-volume:/usr/local/tomcat \
tomcat:9.0.10-jre8
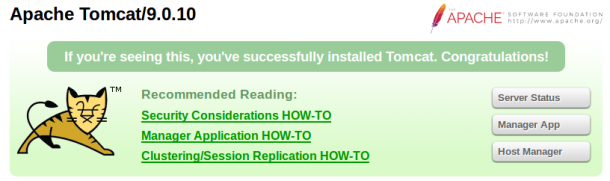
We are using a volume to expose configuration and deployment files externally (located at /usr/local/tomcat). Visit localhost:8080 in a browser to access Tomcat’s main page.
2. Configure Tomcat
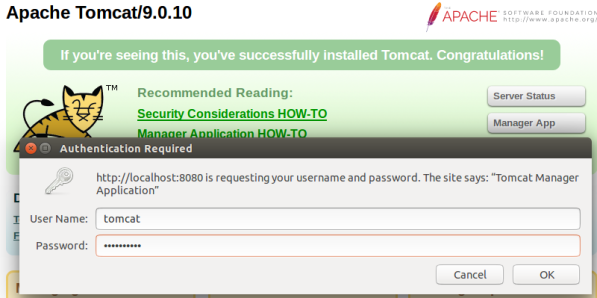
If we try to access Server Status, Manager App, or Host Manager we get an access denied response. To resolve this, we follow the instructions on the error page (also refer to this page for additional information).
Let’s find out what folder the volume is using with
docker volume inspect tomcat-volume
Access the folder and edit conf/tomcat-users.xml. Add the following lines (there are commented examples already in the file).
<role rolename="tomcat"/>
<role rolename="manager-gui"/>
<user username="tomcat" password="tomcatPass" roles="tomcat,manager-gui"/>
We’re defining two roles and creating a user with those two roles (note: the password used in this example is not secure!).
There is one more change needed. By default, Tomcat allows Manager App access only if the browser is on the same machine as the server. To lift this restriction, access the file webapps/manager/META-INF/context.xml in the volume and change the allow string as below
<Valve className="org.apache.catalina.valves.RemoteAddrValve"
 allow=".*" />
This gives permission to all IPs. For am actual deployment, set restrictions as needed. Restart the Tomcat container to make the configuration changes effective. Now we can access the Manager App GUI and we can use it to deploy a sample servlet. Enter the credentials defined in tomcat-users.xml.
3. Set up Eclipse
To develop the servlet, we will use Eclipse’s Web Tool Platform. Refer to Vogella’s Java Web Development with Eclipse WTP Tutorial for more details. Eclipse Oxygen.3a was used for this example.
Make sure you have the necessary packages installed as explained in the tutorial (Help -> About Eclipse -> Installation Details). To install new package, go to Help -> Install New Software.
- Eclipse Java EE Developer Tools
- Eclipse Java Web Developer Tools
- Eclipse Web Developer Tools
For this example, we are not going to set up a local server. We will write the servlet and deploy the .war file manually through the Manager App interface.
4. Write the Servlet
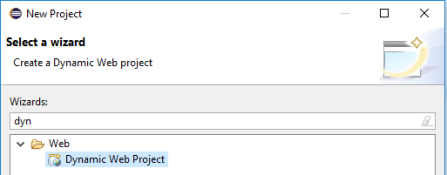
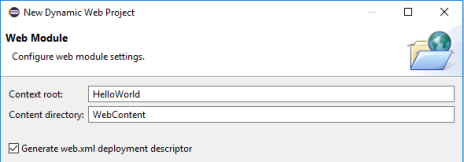
Create a Dynamic Web Project
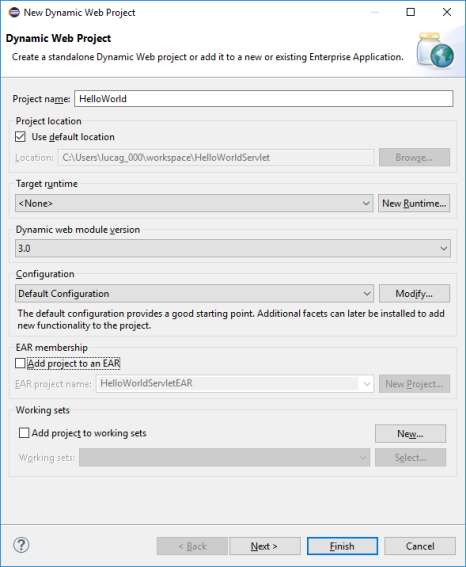
Enter the Project name (HelloWorld). Leave all other settings default. In particular, we will take care of the Target Runtime later. In the last screen, select create web.xml descriptor.
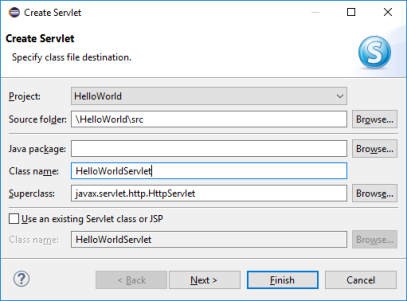
Press Finish and the project is created. The Java Resources -> src folder is empty. Right click on the project and select New -> Servlet. Name the servlet HelloWorldServlet.
Basic servlet code is generated. The servlet references are missing because we did not set a target runtime. We need to get a copy of the servlet-api.jar from our Tomcat server. It is located in the Docker volume, in the lib directory. Then
- Right click on Eclipse project and select Properties. Open Java Build Path.
- Under the Libraries tab, select Add External JARs, and add the servlet-api.jar.
- The library is added to the project under Java Resources -> Libraries -> Referenced Libraries.
The servlet references in the code are now resolved. In the code, customize the URL mapping.
@WebServlet("/Hello")
Update the doGet method
protected void doGet(HttpServletRequest request, HttpServletResponse response) throws ServletException, IOException {
    response.setContentType("text/html");
    response.getWriter().println("<h1>Hello World</h1>");
}
Now, we are ready to generate the WAR file to deploy. Right click on the project and select Export -> WAR file. Export to HelloWorld.war.
5. Deploy the Servlet
Go to the Manager App page. Scroll to the section WAR File to deploy, select HelloWorld.war and press Deploy.

The servlet is added to the list of applications.

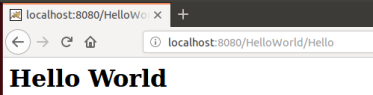
In a browser, visit localhost:8080/HelloWorld/Hello. We’re done!
Useful Links
http://www.vogella.com/tutorials/EclipseWTP/article.html
http://www.srccodes.com/p/article/3/Tomcat-Hello-World-Servlet-using-Eclipse-IDE
